> ## Documentation Index
> Fetch the complete documentation index at: https://help.oskaros.com/llms.txt
> Use this file to discover all available pages before exploring further.
# Staff Accounts & Permissions
> Manage your internal team with Oskar
### Manage your internal users, roles, and access levels
Oskar now makes it easy to manage your internal team directly within the platform. Instead of handling staff only as bookable resources, you can now **invite real user accounts**, assign roles, and control what each person can see and do in your workspace.
This feature gives your team structured access — whether you’re sharing your calendar with a colleague, adding a manager to oversee bookings, or giving an assistant permission to manage events.
### Where to Find It
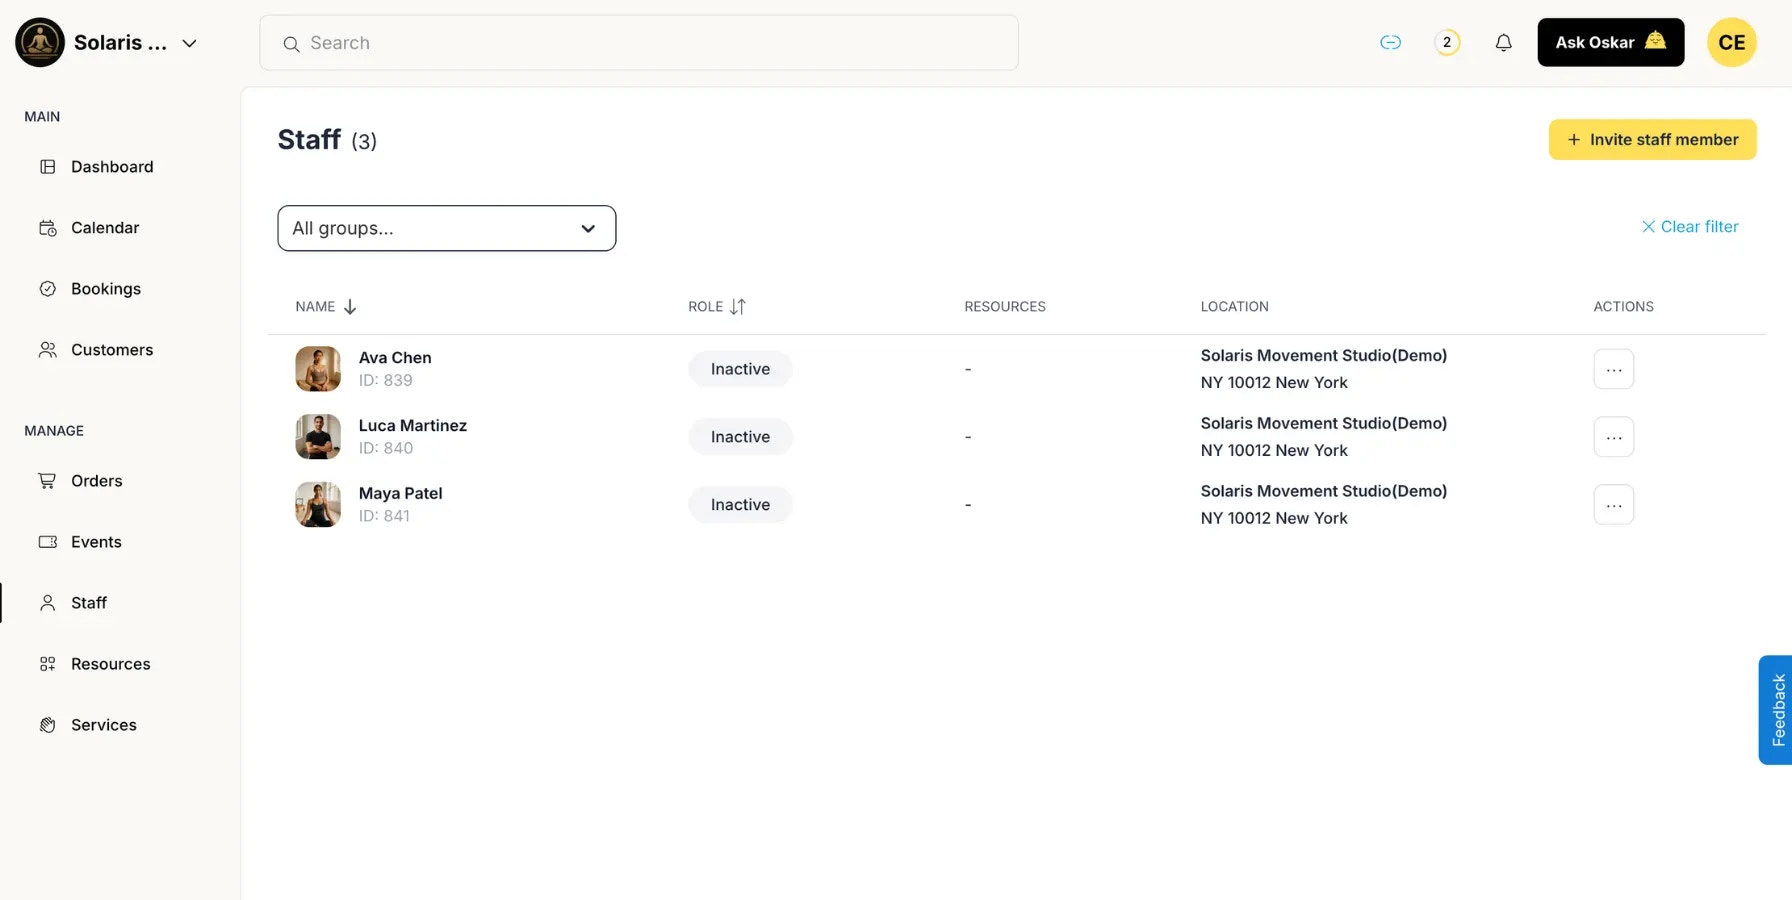
You’ll find everything under **Left Menu > MANAGE > Staff**.\
This new section shows a list of all invited team members, their roles, and current access status.
 ### How to Invite a Team Member
1. Go to **Left Menu > MANAGE > Staff**.
2. Click the yellow **Invite Staff Member** button (top right).
3. Fill in the following details:
* **Name** – The person’s full name as it should appear in Oskar.
* **Email Address** – Where the invitation will be sent.
* **Location / Workspace** – Assign the person to the correct branch or location if you manage multiple.
4. Choose the **Role** (see below).
5. Click **Send Invitation**.
The invited user will receive an email from Oskar with a link to set a password and activate their account. Once confirmed, they can log in at [https://app.oskaros.com/](https://app.oskaros.com/) and will see only the sections they have permission to access.
### Roles & Permissions
### How to Invite a Team Member
1. Go to **Left Menu > MANAGE > Staff**.
2. Click the yellow **Invite Staff Member** button (top right).
3. Fill in the following details:
* **Name** – The person’s full name as it should appear in Oskar.
* **Email Address** – Where the invitation will be sent.
* **Location / Workspace** – Assign the person to the correct branch or location if you manage multiple.
4. Choose the **Role** (see below).
5. Click **Send Invitation**.
The invited user will receive an email from Oskar with a link to set a password and activate their account. Once confirmed, they can log in at [https://app.oskaros.com/](https://app.oskaros.com/) and will see only the sections they have permission to access.
### Roles & Permissions
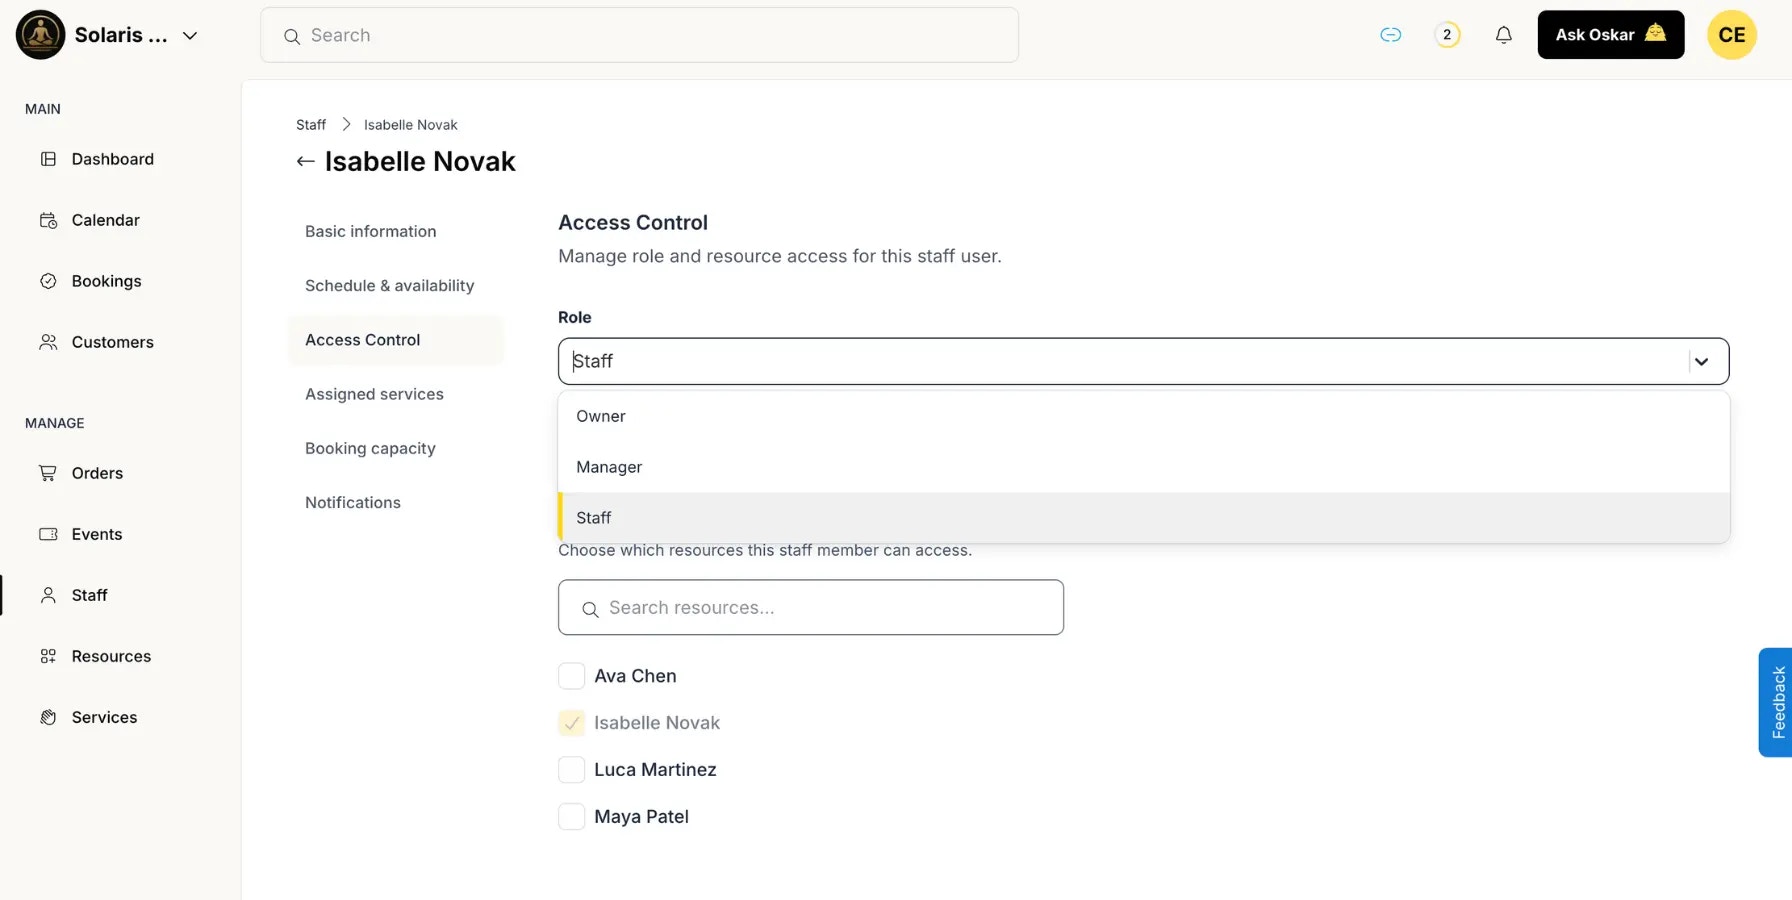 Each staff member can be assigned one of three roles:
| **Role** | **Access Level** | **Typical Use Case** |
| :---------- | :------------------------------------------------------------------------------------------------------ | :-------------------------------------------------- |
| **Owner** | Full administrative rights, including billing, organization settings, and deletion of the account. | Founders or business owners. |
| **Manager** | Nearly full rights: can manage all resources, events, and staff but **cannot delete the organization**. | Studio or team leads. |
| **Staff** | Limited access: can manage only assigned resources, events, or colleagues. | Instructors, assistants, or part-time team members. |
For **Staff** roles, you can fine-tune access even further:
* Decide **which resources or colleagues** the user can manage.
* Optionally grant permission to **manage events or courses**.
### Example
> “Invite Emma ([emma@sunnyyoga.com](mailto:emma@sunnyyoga.com)) as Staff for our ‘Morning Flow’ classes and let her manage only her own bookings and class events.”
>
> Emma will receive her invitation email, set her password, and log in to manage her assigned schedule — without seeing other instructors’ calendars.
### Managing Invitations
* **Resend Invite** – If a user didn’t receive the invitation email, select their name in the staff list and click **Resend Invite**.
* **Revoke Access** – To remove a user’s access, select them and click **Revoke Access**. Their account will be deactivated immediately, while historical bookings remain untouched.
### Migrating Existing Staff Resources
If you previously added team members as *Resources* (e.g., “Anna, Yoga Instructor”) without giving them login access, you can now **migrate them into full user accounts**:
1. Go to **Left Menu > MANAGE > Resources**.
2. Select the staff resource.
3. Click **Invite to Oskar**.
4. The resource will receive an invitation email and, once accepted, will automatically link to their existing resource profile — keeping all availability, bookings, and event data intact.
### Pro Tips
* Give **Managers** access when you trust them to oversee daily operations but still want to have the full control over your account.
* For **temporary instructors or freelancers**, assign the **Staff** role and restrict them to specific resources or events.
* Use **Revoke Access** when contracts end — it’s instant and keeps data safe.
Each staff member can be assigned one of three roles:
| **Role** | **Access Level** | **Typical Use Case** |
| :---------- | :------------------------------------------------------------------------------------------------------ | :-------------------------------------------------- |
| **Owner** | Full administrative rights, including billing, organization settings, and deletion of the account. | Founders or business owners. |
| **Manager** | Nearly full rights: can manage all resources, events, and staff but **cannot delete the organization**. | Studio or team leads. |
| **Staff** | Limited access: can manage only assigned resources, events, or colleagues. | Instructors, assistants, or part-time team members. |
For **Staff** roles, you can fine-tune access even further:
* Decide **which resources or colleagues** the user can manage.
* Optionally grant permission to **manage events or courses**.
### Example
> “Invite Emma ([emma@sunnyyoga.com](mailto:emma@sunnyyoga.com)) as Staff for our ‘Morning Flow’ classes and let her manage only her own bookings and class events.”
>
> Emma will receive her invitation email, set her password, and log in to manage her assigned schedule — without seeing other instructors’ calendars.
### Managing Invitations
* **Resend Invite** – If a user didn’t receive the invitation email, select their name in the staff list and click **Resend Invite**.
* **Revoke Access** – To remove a user’s access, select them and click **Revoke Access**. Their account will be deactivated immediately, while historical bookings remain untouched.
### Migrating Existing Staff Resources
If you previously added team members as *Resources* (e.g., “Anna, Yoga Instructor”) without giving them login access, you can now **migrate them into full user accounts**:
1. Go to **Left Menu > MANAGE > Resources**.
2. Select the staff resource.
3. Click **Invite to Oskar**.
4. The resource will receive an invitation email and, once accepted, will automatically link to their existing resource profile — keeping all availability, bookings, and event data intact.
### Pro Tips
* Give **Managers** access when you trust them to oversee daily operations but still want to have the full control over your account.
* For **temporary instructors or freelancers**, assign the **Staff** role and restrict them to specific resources or events.
* Use **Revoke Access** when contracts end — it’s instant and keeps data safe.